Structured Website Hack for Blogger
Introduction
This tutorial describes a way of adding to the default Blogger blog a structure that resembles a conventional website. Technically, the methods described in this tutorial are very simple and involves nothing more than coding a few links with HTML. This tutorial is more of an exercise in the rearrangement of information for a particular purpose, using Blogger as an example. It is also a minor exploration of the possibilities and limits of Blogger.
The Blogger blog structure
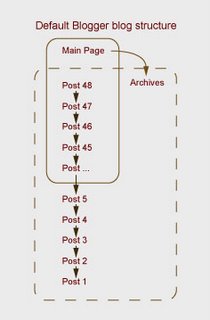
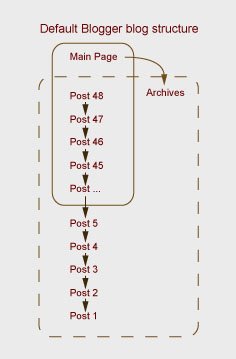
The typical blog operates like a stream-of-consciousness narrative: entries to the blog are posted sequentially in chronological order, and every post has the same importance as every other post. The blog structure does not privilege any individual post over any other. Recent posts are listed on the main page, while older posts are stored sequentially in the archives. It is one story with one timeline. Below is a diagram describing this structure.
A typical website structure
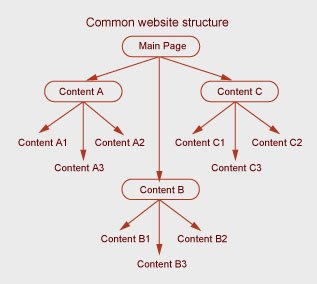
When we consider website structures, we often encounter a hierarchal tree structure. At the top is the home page, which has links to a number of pages with more specific content on each. From each of these content pages, there may be more links to further sub-pages with even more specialised content. The tree structure is an effective way of organising substantial amounts of information by categorising the information into related groups. Below is a diagram describing this structure.
Problem
Personally, I do not wish to have a website entirely devoted to a continuous stream-of-consciousness rant. Although I am quite happy to rant occasionally, I can also think of other things to publish online which I would rather not disappear into the archives of a blog. For example, I am considering putting my Curriculum Vitae online. However, if I post my CV as a blog entry, and then I keep posting blog entries as usual, my CV will soon disappear into my archives and new visitors to my blog would not know about it unless they stumble across it in the archives. I can also think of other things to put online which I would rather have relatively permanent.
How, then, do I use Blogger (which is free) to publish permanent content like a conventional website, while still having a blog to rant in?
Solution
(This section involves HTML. For more information on HTML than you might want to know about, see http://www.w3.org/MarkUp/. Or alternatively, do an internet search for HTML tutorials. You might also like to consult the Blogger help at http://help.blogger.com/.)
Fortunately, Blogger blogs are fairly customisable if you know a little bit about HTML and web programming, and each post has a permanent URL and acts as an individual webpage. Most templates come with a sidebar that has a heading for links. The general assumption is that these would be links to other websites, but they can just as easily be links to individual posts of the same blog. Thus, we can co-opt or copy the links section into being an internal navigation.
Firstly, we need to create the pages that we wish to be permanent. This is as simple as making a posts with the appropriate titles and content for the pages. For example, I might post my CV as a blogger entry, and title it “My CV” or something similar. After the posts have been published, visit them and take a note of their URLs.
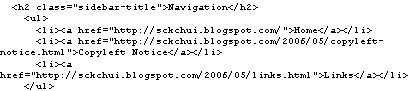
Next, we make the navigation. To do this, go to the Blogger Dashboard > Change blog settings > Template > Edit current, and scroll down to something that looks like . I began with the Minima template, and the section we are concerned with looked like this:
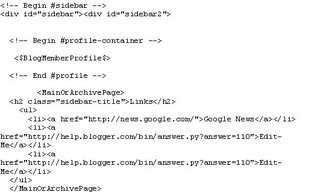
 describes the title of the section, and I replaced “Links” with “Navigation”, although you may call it whatever you like.
 describes the links. The "li" tag works with "ui" tag to put the links into a list, which I thought was good so I left them. The bit inside the quote marks after href= is the URL of the link, so copy the URL of one of your pages into this. The bit after that are the words that appear on the page, so probably put the title of the page here.
You can have as many lines of the code as you like, so make one for each of your links.
Last of all, get rid of the "MainOrArchivePage" tags, because you want the navigation to be on all pages.
As of the writing of this tutorial, my HTML looked like this:

Republish your blog, and you should have a navigation panel in your sidebar that directly links to specific important posts, though they really are more like pages. These pages are now permanent in the sense that they are always directly accessible from all your pages. If you ever want to change the content of these pages, you simply edit the posts.
Elaboration
The method described above only creates one level of content pages beyond the main page. Websites with substantial amounts of content can easily have many levels of sub-pages as categories are subdivided to make the information manageable. If, for example, I have a collection of tutorials, some of them are Blogger hacks, some of them are for photo editing, and some of them are for 3D modelling, how can I organise them? Because it is possible (and quite easy) to put links in posts, I would create a “Tutorials” post, which is in actuality a list of links to the individually posted tutorials. Then I would place a link to the “Tutorials” post in the navigation panel. That way, in order to find any particular tutorial from any page, a visitor would click on “Tutorials” in the navigation panel, click on the desired tutorial that comes up in the list, much the same way as one would navigate a website which was not a blog.
Conclusion
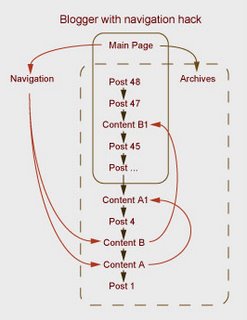
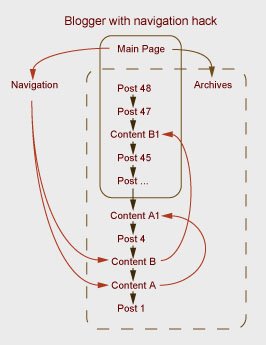
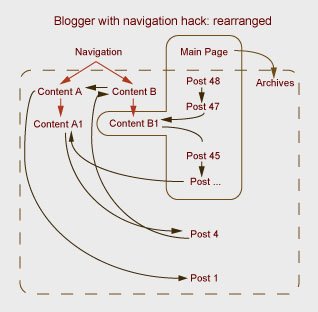
After doing the above, one would have a website that was simultaneously a blog and a conventional website. The blog continues to be a blog, with its continuous stream-of-consciousness postings, although occasionally there would be a post that seemed to want to be a permanent page (like a tutorial or a CV). On the sidebar is a navigation panel, and clicking into this would bypass all the interesting but inconsequential blog entries, taking the visitor into the content pages. Below are two diagrams describing this new arrangement. The first diagram shows the blog as primary and the content as secondary, and the second diagram shows the content as primary and the blog as secondary. Thus the same information can be conceptually arranged in more than one way, even though its physical arrangement is one and the same.

Simon Chun Kwan Chui
5/26/2006
This tutorial describes a way of adding to the default Blogger blog a structure that resembles a conventional website. Technically, the methods described in this tutorial are very simple and involves nothing more than coding a few links with HTML. This tutorial is more of an exercise in the rearrangement of information for a particular purpose, using Blogger as an example. It is also a minor exploration of the possibilities and limits of Blogger.
The Blogger blog structure
The typical blog operates like a stream-of-consciousness narrative: entries to the blog are posted sequentially in chronological order, and every post has the same importance as every other post. The blog structure does not privilege any individual post over any other. Recent posts are listed on the main page, while older posts are stored sequentially in the archives. It is one story with one timeline. Below is a diagram describing this structure.
A typical website structure
When we consider website structures, we often encounter a hierarchal tree structure. At the top is the home page, which has links to a number of pages with more specific content on each. From each of these content pages, there may be more links to further sub-pages with even more specialised content. The tree structure is an effective way of organising substantial amounts of information by categorising the information into related groups. Below is a diagram describing this structure.

Problem
Personally, I do not wish to have a website entirely devoted to a continuous stream-of-consciousness rant. Although I am quite happy to rant occasionally, I can also think of other things to publish online which I would rather not disappear into the archives of a blog. For example, I am considering putting my Curriculum Vitae online. However, if I post my CV as a blog entry, and then I keep posting blog entries as usual, my CV will soon disappear into my archives and new visitors to my blog would not know about it unless they stumble across it in the archives. I can also think of other things to put online which I would rather have relatively permanent.
How, then, do I use Blogger (which is free) to publish permanent content like a conventional website, while still having a blog to rant in?
Solution
(This section involves HTML. For more information on HTML than you might want to know about, see http://www.w3.org/MarkUp/. Or alternatively, do an internet search for HTML tutorials. You might also like to consult the Blogger help at http://help.blogger.com/.)
Fortunately, Blogger blogs are fairly customisable if you know a little bit about HTML and web programming, and each post has a permanent URL and acts as an individual webpage. Most templates come with a sidebar that has a heading for links. The general assumption is that these would be links to other websites, but they can just as easily be links to individual posts of the same blog. Thus, we can co-opt or copy the links section into being an internal navigation.
Firstly, we need to create the pages that we wish to be permanent. This is as simple as making a posts with the appropriate titles and content for the pages. For example, I might post my CV as a blogger entry, and title it “My CV” or something similar. After the posts have been published, visit them and take a note of their URLs.
Next, we make the navigation. To do this, go to the Blogger Dashboard > Change blog settings > Template > Edit current, and scroll down to something that looks like . I began with the Minima template, and the section we are concerned with looked like this:

 describes the title of the section, and I replaced “Links” with “Navigation”, although you may call it whatever you like.
 describes the links. The "li" tag works with "ui" tag to put the links into a list, which I thought was good so I left them. The bit inside the quote marks after href= is the URL of the link, so copy the URL of one of your pages into this. The bit after that are the words that appear on the page, so probably put the title of the page here.
You can have as many lines of the code as you like, so make one for each of your links.
Last of all, get rid of the "MainOrArchivePage" tags, because you want the navigation to be on all pages.
As of the writing of this tutorial, my HTML looked like this:
Republish your blog, and you should have a navigation panel in your sidebar that directly links to specific important posts, though they really are more like pages. These pages are now permanent in the sense that they are always directly accessible from all your pages. If you ever want to change the content of these pages, you simply edit the posts.
Elaboration
The method described above only creates one level of content pages beyond the main page. Websites with substantial amounts of content can easily have many levels of sub-pages as categories are subdivided to make the information manageable. If, for example, I have a collection of tutorials, some of them are Blogger hacks, some of them are for photo editing, and some of them are for 3D modelling, how can I organise them? Because it is possible (and quite easy) to put links in posts, I would create a “Tutorials” post, which is in actuality a list of links to the individually posted tutorials. Then I would place a link to the “Tutorials” post in the navigation panel. That way, in order to find any particular tutorial from any page, a visitor would click on “Tutorials” in the navigation panel, click on the desired tutorial that comes up in the list, much the same way as one would navigate a website which was not a blog.
Conclusion
After doing the above, one would have a website that was simultaneously a blog and a conventional website. The blog continues to be a blog, with its continuous stream-of-consciousness postings, although occasionally there would be a post that seemed to want to be a permanent page (like a tutorial or a CV). On the sidebar is a navigation panel, and clicking into this would bypass all the interesting but inconsequential blog entries, taking the visitor into the content pages. Below are two diagrams describing this new arrangement. The first diagram shows the blog as primary and the content as secondary, and the second diagram shows the content as primary and the blog as secondary. Thus the same information can be conceptually arranged in more than one way, even though its physical arrangement is one and the same.
Simon Chun Kwan Chui
5/26/2006
posted by sckChui at 10:36 pm
![]()


0 Comments:
Post a Comment
<< Home